
In today’s digital landscape, securing your website with an SSL (Secure Sockets Layer) certificate is no longer optional—it’s essential. An SSL certificate encrypts data transmitted between your website and its visitors, ensuring privacy and trust. While premium SSL certificates are available, many hosting providers, including Plesk, offer free SSL options that are both reliable and easy to install. In this guide, we’ll walk you through the process of installing a free SSL certificate in the Plesk Control Panel using Let’s Encrypt, one of the most popular free SSL providers.
Table of Contents
Why Use an SSL Certificate?
Before diving into the installation process, let’s understand the importance of SSL certificates:
- Data Encryption: SSL encrypts the data exchanged between your website and its visitors, protecting sensitive information like login credentials, personal details, and payment information.
- Enhanced Security: It safeguards your website against cyber threats such as man-in-the-middle attacks and data breaches.
- Trust and Credibility: Websites with SSL certificates display a padlock icon in the browser’s address bar, signaling to visitors that your site is secure.
- SEO Benefits: Search engines like Google favor secure websites, potentially boosting your site’s ranking in search results.
- Compliance Requirements: Certain regulations, such as GDPR, mandate the use of SSL for websites handling user data.
Benefits of Using a Free SSL Certificate
Opting for a free SSL certificate offers several advantages:
- Cost-Effective: Eliminate the expense of purchasing premium SSL certificates.
- Easy Installation: Free SSL providers like Let’s Encrypt integrate seamlessly with Plesk, simplifying the installation process.
- Automated Renewals: Many free SSL certificates support automatic renewal, ensuring continuous security without manual intervention.
- Adequate Security: Free SSL certificates provide the same level of encryption as their paid counterparts, making them suitable for most websites.
Step-by-Step Guide to Install a Free SSL Certificate in Plesk
Prerequisites
Before you begin, ensure you have the following:
- Access to Plesk Control Panel: You need administrative or reseller access to the Plesk dashboard.
- Registered Domain: Ensure your domain is correctly pointed to your Plesk server.
- Let’s Encrypt Extension: Most Plesk installations come with Let’s Encrypt pre-installed. If not, you can add it via the Plesk Extensions Catalog.
Step 1: Log in to Plesk Control Panel
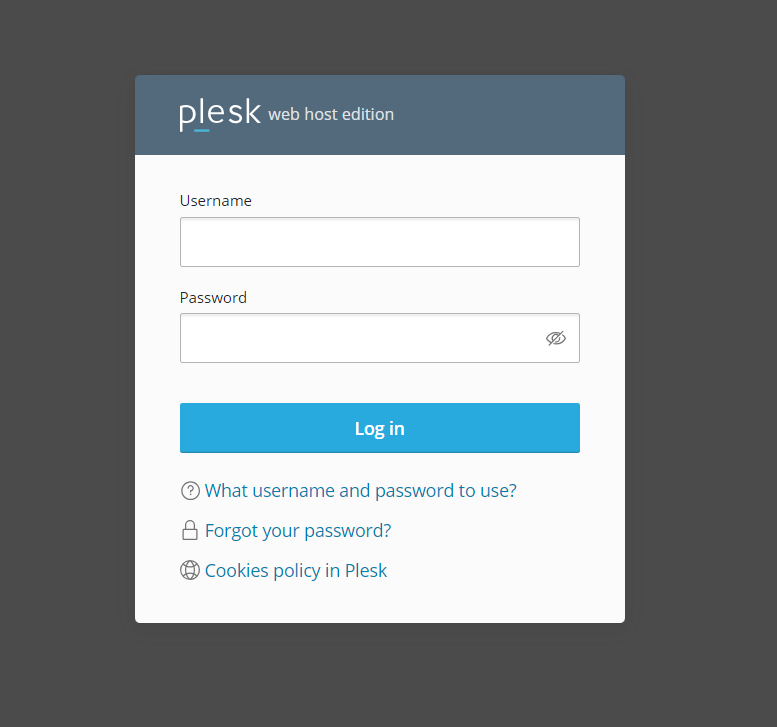
- Open your web browser and navigate to your Plesk login URL, typically
https://yourdomain.com:8443. - Enter your username and password, then click Log In to access the Plesk dashboard.
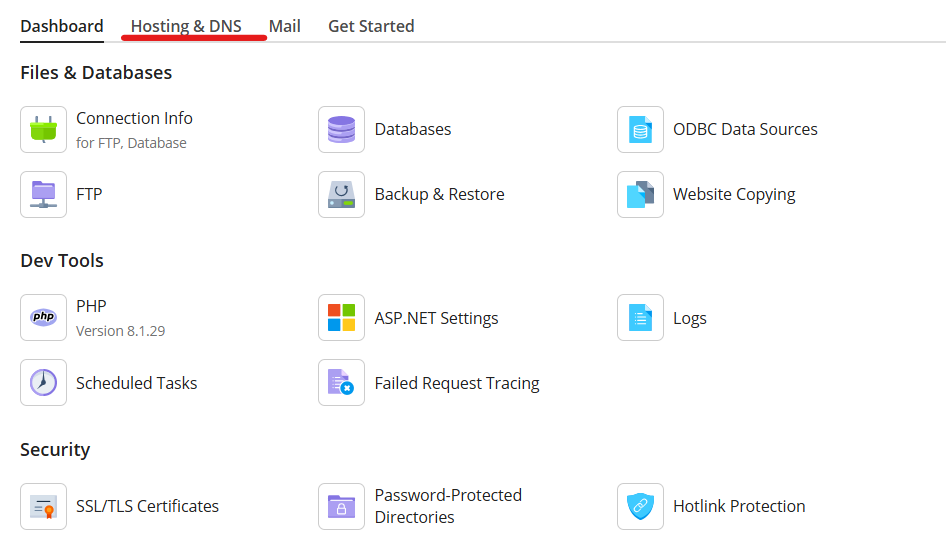
Step 2: Navigate to the Websites & Domains Section
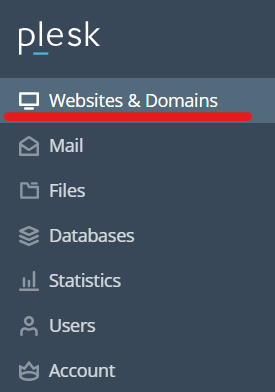
- Once logged in, locate the Websites & Domains tab on the left-hand sidebar and click on it.
- You’ll see a list of all domains hosted on your Plesk server.
Step 3: Select the Domain for SSL Installation
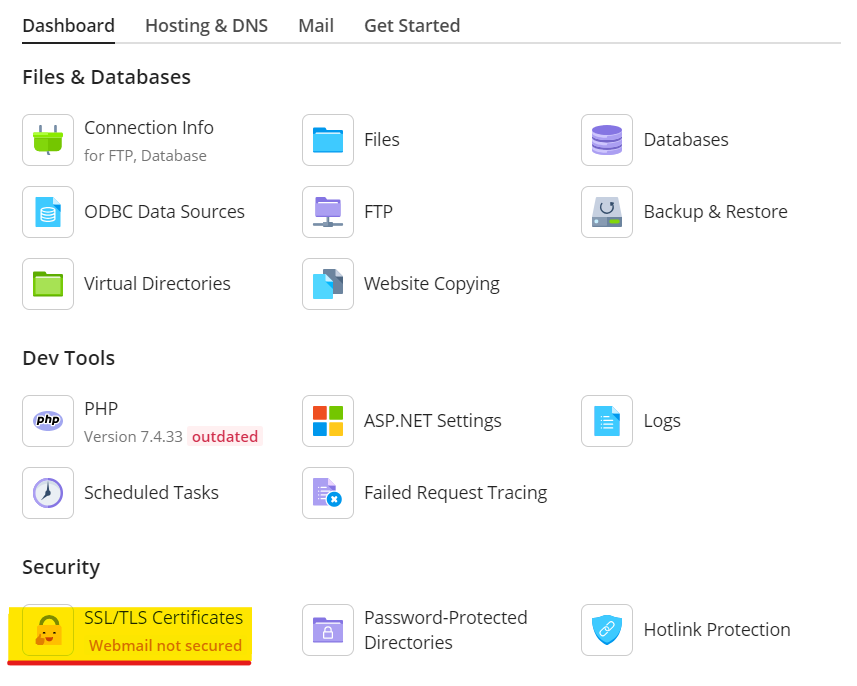
- Find the domain for which you want to install the SSL certificate.
- Click on SSL/TLS Certificates or directly on Let’s Encrypt if available.
Step 4: Install the Free SSL Certificate Using Let’s Encrypt
Option A: Using the Let’s Encrypt Extension
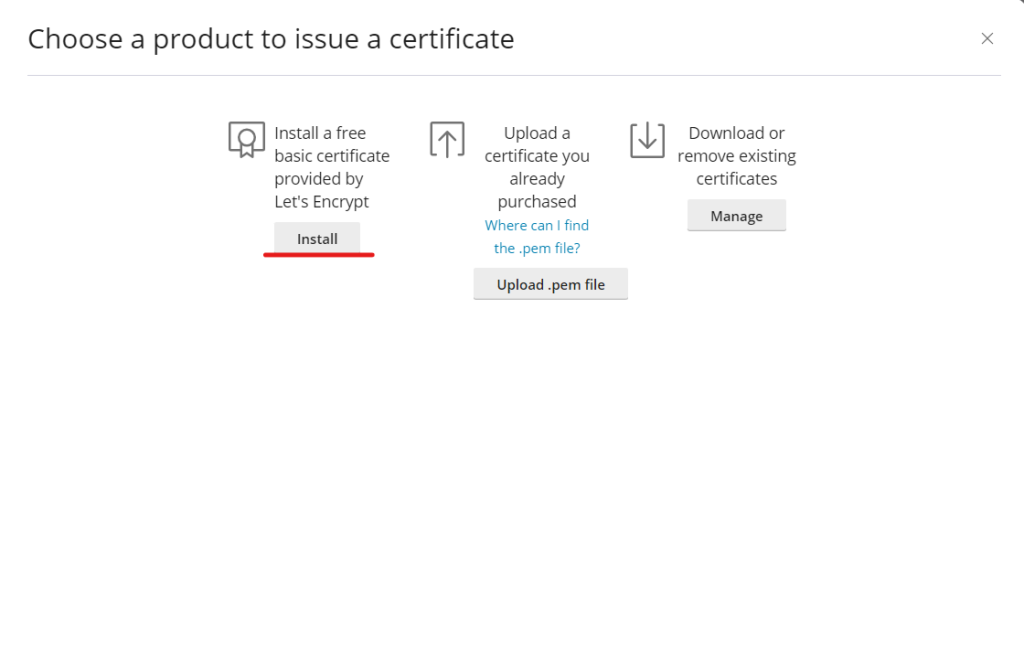
- Click on Let’s Encrypt:
- Within the domain’s SSL/TLS settings, locate and click on the Let’s Encrypt icon.
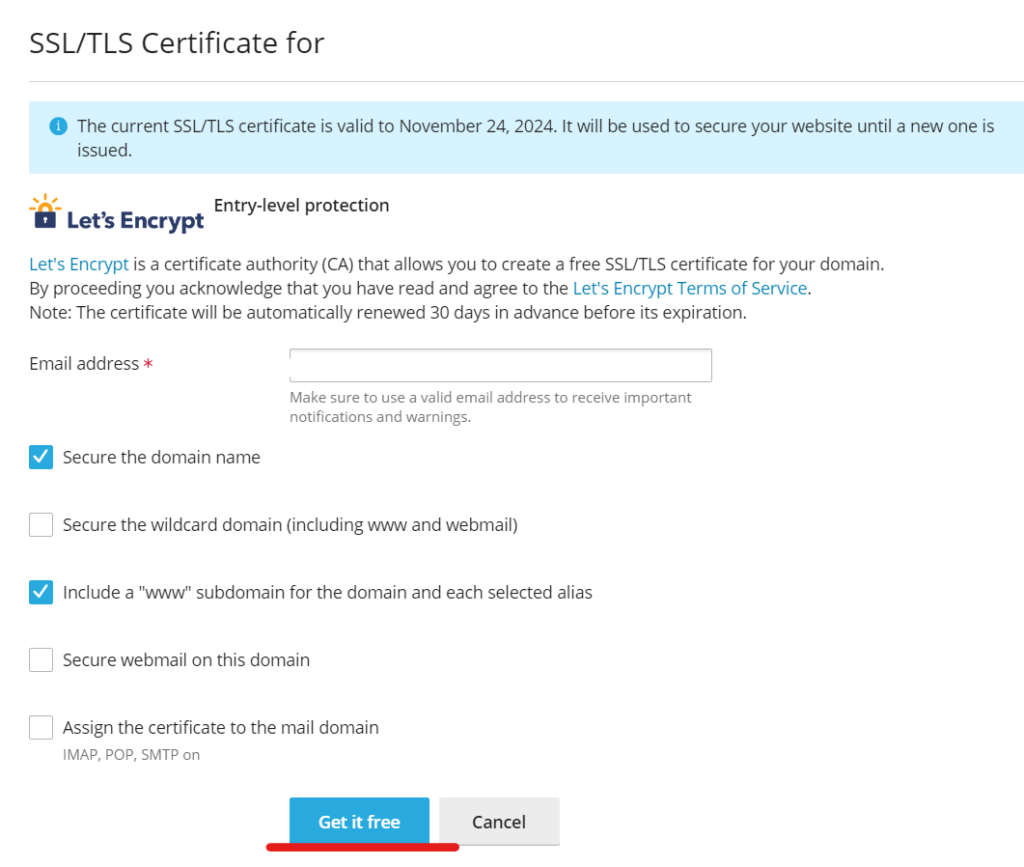
- Enter Email Address:
- Provide a valid email address. This is used for certificate renewal notifications and important account-related information.
- Select Domains for Certificate:
- Ensure that the checkbox for the domain (
yourdomain.com) is selected. - You can also select additional subdomains (e.g.,
www.yourdomain.com) if desired.
- Ensure that the checkbox for the domain (
- Agree to Terms:
- Check the box to agree to the Let’s Encrypt Terms of Service.
- Click Install:
- Click the Install button to initiate the SSL certificate installation process.
- Confirmation:
- Once the installation is complete, you’ll receive a confirmation message indicating that the SSL certificate has been successfully installed.
Option B: Using the SSL/TLS Certificates Interface
- Click on Add SSL/TLS Certificate:
- If Let’s Encrypt isn’t directly available, navigate to SSL/TLS Certificates and click on Add SSL/TLS Certificate.
- Choose Let’s Encrypt:
- In the certificate creation options, select Let’s Encrypt as the certificate provider.
- Follow the Same Steps as Option A:
- Enter your email, select the domains, agree to the terms, and click Install.
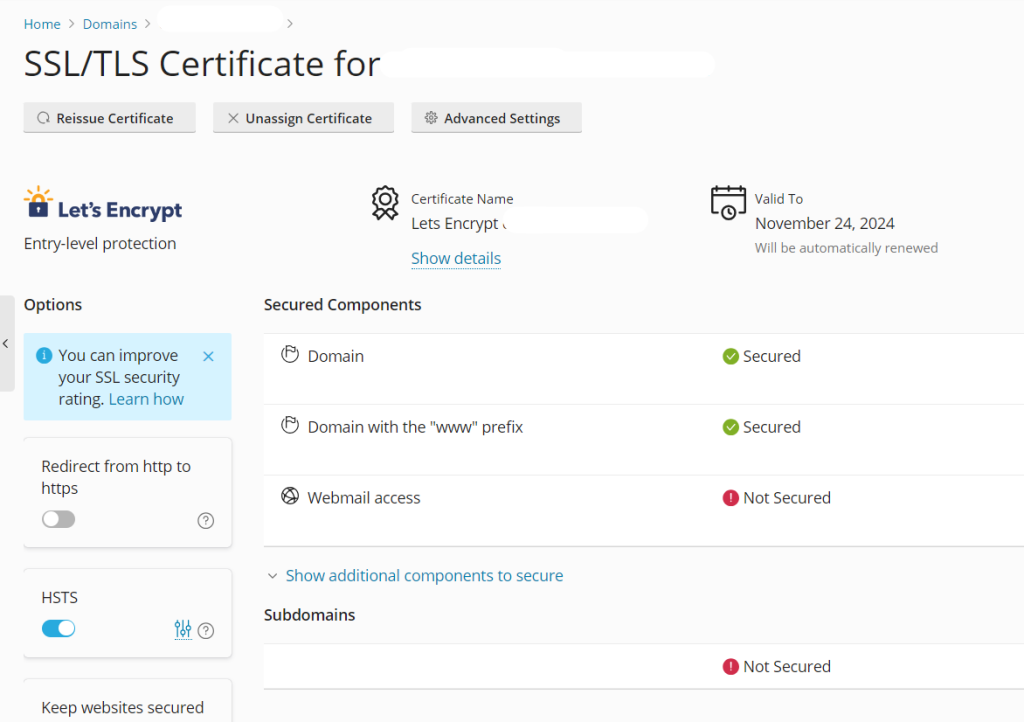
Step 5: Secure the Domain with the Installed SSL Certificate
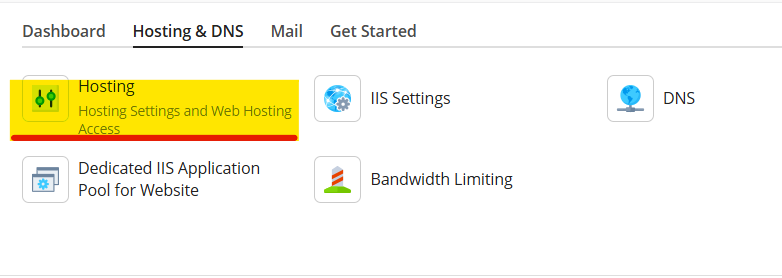
- Go Back to Websites & Domains:
- Return to the Websites & Domains section if you’re not already there.
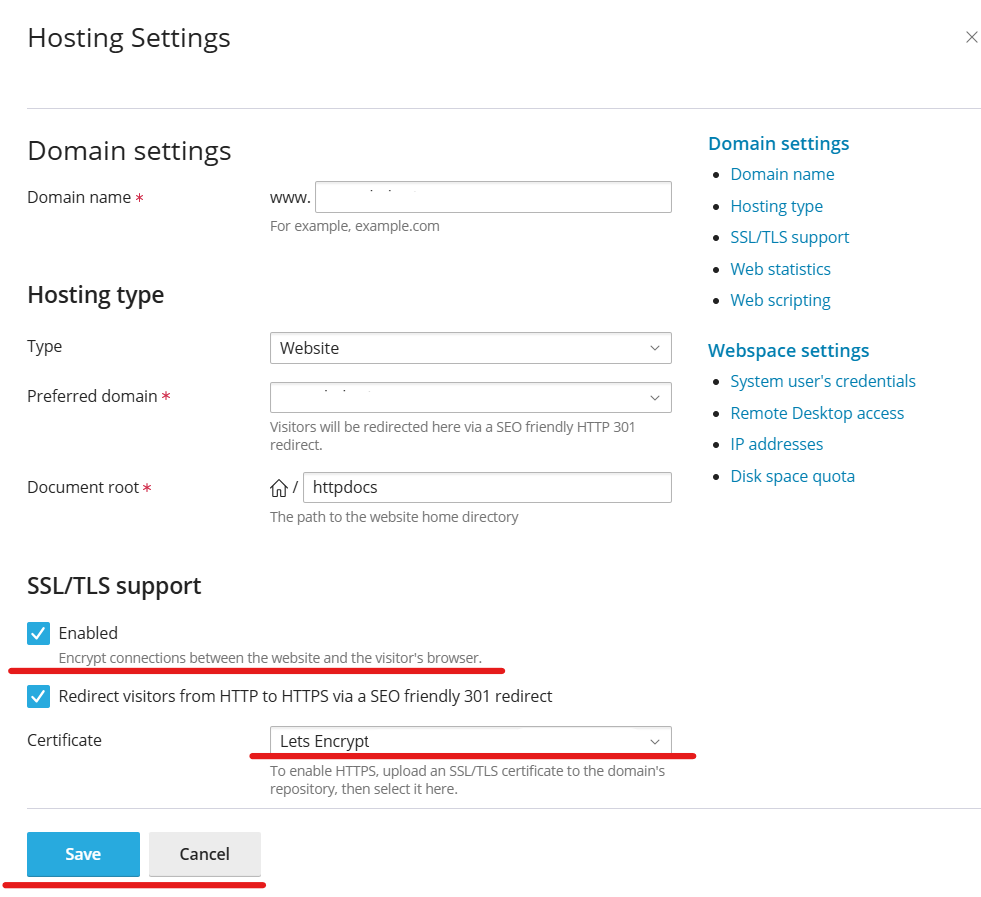
- Click on Hosting Settings:
- For the selected domain, click on Hosting Settings.
- Enable SSL/TLS Support:
- Check the box labeled SSL/TLS support.
- Select the SSL/TLS Certificate:
- From the dropdown menu, choose the newly installed Let’s Encrypt certificate.
- Force HTTPS (Optional but Recommended):
- To ensure all traffic uses HTTPS, check the box labeled Permanent SEO-safe 301 redirect from HTTP to HTTPS.
- Save Changes:
- Click OK or Apply to save your hosting settings.
Step 6: Verify the SSL Installation
- Visit Your Website:
- Open your web browser and navigate to
https://yourdomain.com.
- Open your web browser and navigate to
- Check the Padlock Icon:
- Ensure that a padlock icon appears in the browser’s address bar, indicating a secure connection.
- SSL Checker Tool (Optional):
- Use online tools like SSL Labs’ SSL Test to verify the SSL and configuration.
Step 7: Enable Automatic Renewal (Handled by Let’s Encrypt)
Let’s Encrypt certificates are valid for 90 days. Plesk typically handles automatic renewals, but it’s good practice to ensure this feature is enabled.
- Navigate to Let’s Encrypt Settings:
- Go back to the Let’s Encrypt section under SSL/TLS Certificates.
- Check Renewal Settings:
- Ensure that the option for automatic renewal is enabled. This allows Plesk to automatically renew the certificate before it expires.
- Save Any Changes:
- If you made any adjustments, save them to confirm automatic renewals.
Troubleshooting Common Issues
1. Certificate Not Installing
- Check Domain DNS Settings: Ensure your domain’s DNS records point correctly to your Plesk server.
- Firewall Restrictions: Verify that your server’s firewall allows traffic on port 443 (HTTPS) and port 80 (HTTP).
- Let’s Encrypt Rate Limits: If you’ve attempted multiple installations in a short period, you might hit Let’s Encrypt’s rate limits. Wait a while before trying again.
2. Browser Shows Insecure Connection
- Clear Browser Cache: Sometimes, old cache data can cause issues. Clear your browser’s cache and try accessing your site again.
- Mixed Content Issues: Ensure all resources (images, scripts, stylesheets) are loaded over HTTPS. Update any hard-coded HTTP links in your website’s code.
3. Automatic Renewal Fails
- Check Email for Notifications: Let’s Encrypt sends renewal failure notifications to the provided email address.
- Verify Renewal Settings: Ensure automatic renewals are enabled in Plesk.
- Server Time Synchronization: Ensure your server’s date and time are correctly set, as discrepancies can affect certificate renewals.
Additional Tips for Managing SSL Certificates in Plesk
- Multiple SSL Certificates: Plesk allows you to install multiple SSL certificates for different domains and subdomains.
- Wildcard SSL Certificates: If you need SSL for multiple subdomains, consider using a wildcard SSL certificate available through Let’s Encrypt.
- Custom SSL Certificates: For advanced configurations, you can upload custom SSL certificates obtained from other providers.
Conclusion
Securing your website with an SSL certificate is crucial for protecting user data, enhancing trust, and improving your site’s SEO ranking. Plesk Control Panel makes it easy to install and manage free SSL certificates through Let’s Encrypt, offering a cost-effective solution without compromising on security. By following the steps outlined in this guide, you can ensure your website is secure, trustworthy, and ready to provide a safe browsing experience for your visitors.
Embrace the benefits of SSL today and take proactive steps to safeguard your online presence with Plesk’s user-friendly SSL management tools!