
Securing your website with an SSL (Secure Sockets Layer) certificate is crucial in today’s online environment. SSL certificates not only protect sensitive data but also build trust with your users by displaying a secure padlock icon in browsers. With cPanel, enabling free SSL certificates, like those offered by Let’s Encrypt or AutoSSL, is a straightforward process. In this guide, we’ll walk you through enabling free SSL in cPanel to secure your website.
Table of Contents
What is SSL?
SSL encrypts data exchanged between your website and visitors, ensuring that sensitive information like login credentials, personal details, and payment data cannot be intercepted by malicious parties. In addition, SSL certificates enhance your website’s SEO ranking as search engines favor secure websites. For a website to switch from “HTTP” to “HTTPS” (secure), an SSL certificate must be installed.
Benefits of Enabling SSL in cPanel
Before we dive into the setup process, here are the key benefits of enabling SSL:
- Improved Security: SSL encrypts communication between the server and users, securing sensitive data.
- SEO Boost: Google gives ranking preference to websites with SSL certificates.
- Increased Trust: A secure website improves user trust by displaying the padlock symbol and “HTTPS” in the browser.
- Prevent Browser Warnings: Browsers mark unsecured websites as “Not Secure.” SSL prevents this.
- Free SSL Options: With cPanel, you can get free SSL certificates via AutoSSL or Let’s Encrypt.
How to Enable Free SSL in cPanel
Follow these steps to enable free SSL on your website using cPanel:
Step 1: Access cPanel

- Log in to cPanel: Use your credentials to log into your cPanel account. If you’re unsure of the login URL, it’s usually
yourdomain.com/cpanel. - Once logged in, you’ll see the cPanel dashboard, which contains various icons and tools.
Step 2: Locate the SSL/TLS Status or AutoSSL Option
In the cPanel dashboard:
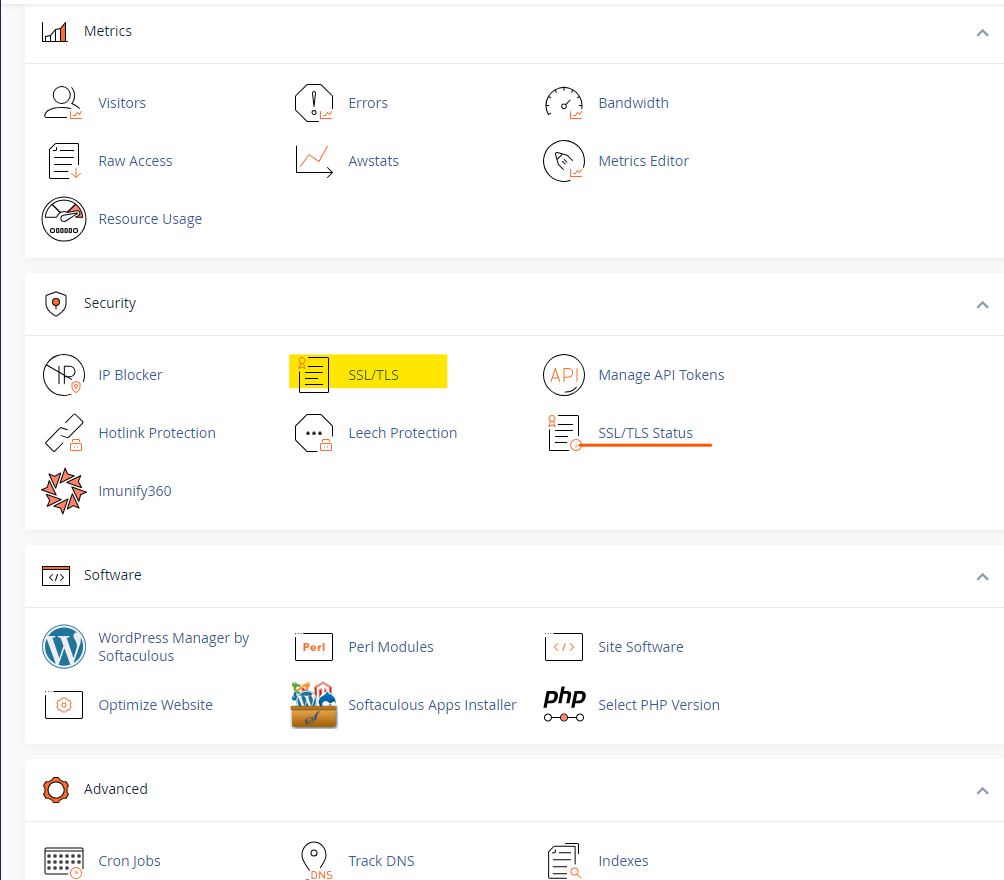
- Scroll down to the Security section.
- Look for the SSL/TLS Status or AutoSSL icon.
- Click on it to open the SSL management tool.
Step 3: Select the Domain(s) to Secure
Once inside the SSL/TLS Status page, you will see a list of your domains and their current SSL status.
- Select Your Domain: Check the box next to the domain(s) you want to secure with SSL.
- Click on the Run AutoSSL or Install Certificate button (depending on your hosting provider’s settings).
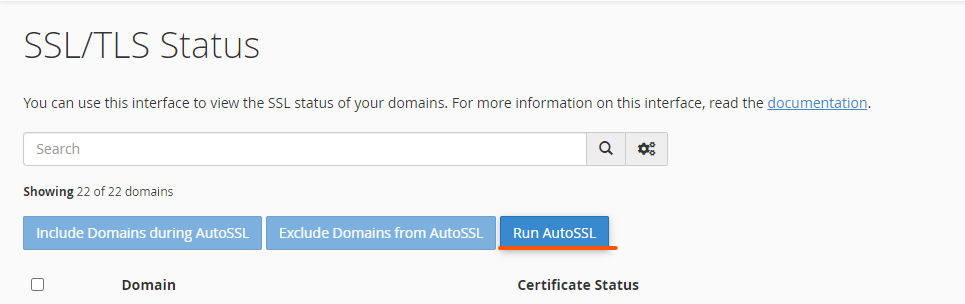
This will prompt cPanel to issue a free SSL certificate for your selected domain via AutoSSL (often powered by Let’s Encrypt).
Step 4: AutoSSL Process
AutoSSL will now:
- Verify Your Domain: This may take a few moments as the system verifies your domain and generates the SSL certificate.
- Install the SSL Certificate: Once verified, the SSL certificate will automatically be installed on your domain.
- You will receive a confirmation message once the installation is complete.
Step 5: Verify SSL Installation
After the SSL certificate has been installed, it’s essential to check if everything is working correctly.
- Check HTTPS: Open your website in a browser and ensure that it now displays “HTTPS” and the padlock symbol.
- SSL Checker Tools: You can also use free online tools like SSL Labs’ SSL Test or What’s My SSL to verify the proper installation of your certificate.
Step 6: Redirect HTTP to HTTPS
To ensure that all users visit the secure version of your website, you need to redirect HTTP traffic to HTTPS.
- Edit .htaccess File: Locate the
.htaccessfile in your website’s root directory. You can do this using the File Manager in cPanel. - Add Redirect Code: Insert the following code at the top of your
.htaccessfile to redirect all traffic to HTTPS:
RewriteEngine On
RewriteCond %{SERVER_PORT} 80
RewriteRule ^(.*)$ https://unlimitedhosting.in/$1 [R,L]
Replace unlimitedhosting.in with your actual domain name. Save the file, and now all traffic will be redirected to HTTPS.
Step 7: Enable SSL for Email (Optional)
If you use email services hosted on your cPanel server, you may also want to secure your email connections using the SSL certificate.
- Go to Email Accounts under the Email section in cPanel.
- Ensure that the email configuration uses SSL/TLS for secure email communications.
Troubleshooting SSL Issues
Occasionally, you might encounter issues during or after SSL installation. Here are some common problems and their fixes:
- DNS Propagation Delays: Sometimes, newly installed SSL certificates might not appear immediately due to DNS propagation delays. Wait for 24-48 hours and check again.
- Certificate Mismatch: If you receive an error about a certificate mismatch, ensure that the SSL certificate is correctly installed for the intended domain.
- Mixed Content Warnings: After enabling SSL, ensure all links and resources (images, scripts) on your website are served over HTTPS. You may need to update hardcoded HTTP links to HTTPS.
Conclusion
Enabling free SSL certificates in cPanel is an essential step to securing your website, improving SEO, and gaining user trust. With AutoSSL or Let’s Encrypt, cPanel makes this process simple and cost-effective. By following the step-by-step instructions in this guide, you can easily install a free SSL certificate and configure your site to run securely over HTTPS.
Ensuring your website is protected by SSL will not only give you peace of mind but also provide a more secure environment for your visitors. Don’t wait—secure your website today!

